Editing the OME documentation
This guide assumes you are already familiar with Using Git and GitHub and only covers where to find the sources, builds etc. you will need to edit and review any given content. Further information on the CI builds is available on the Documentation jobs page.
Some of the live web documentation also features ‘Show on GitHub’ and ‘Edit on GitHub’ links in the lefthand menu which will take you directly to the source file and allow you to edit within the GH interface and then open a PR (you should never use this functionality to edit autogenerated pages, see below for details of these).
Overview
This page covers technical documentation which is written in .rst files
and generated into html using Sphinx. There are sets for each aspect of the
project, plus this set of ‘contributing developer’ documentation aimed at
giving an overview of the OME process and workflows across products that might
be of interest to external people, and the OME internal docs for
internal-only private workflows and processes.
Some of the content for these is either autogenerated or copied from external sources as described below. Formatting and style guidance can be found in the README for the ome-documentation repo, along with instructions for getting set up with Sphinx.
The jekyll websites hosted by OME, which include the Help workflow guides, are covered on Jekyll-hosted websites.
What goes where?
The decision trees below try to give an insight into the thought process behind choosing what information to host where.
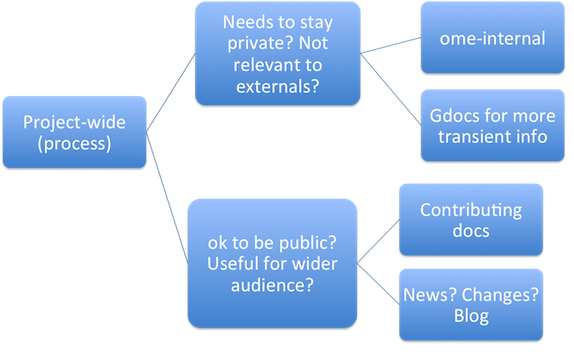
Project-wide information
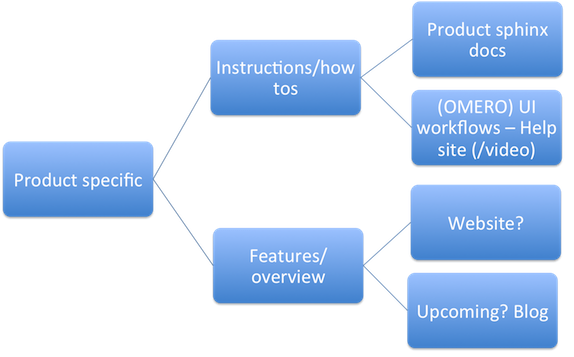
Product-specific information
Bio-Formats documentation
This documentation is hosted at https://bio-formats.readthedocs.io/en/ and covers all aspects of Bio-Formats - using it with other tools, specific guidance for Bio-Formats developers, and supported formats. Related topics - OME file formats and the data model are covered in the OME Data Model and File Formats documentation.
Builds
See Documentation jobs.
Source
The Sphinx documentation is decoupled from the code repository, at https://github.com/ome/bio-formats-documentation.
Building locally
The build uses Sphinx via Maven. mvn will generate the webpages
provided you have both Sphinx and Maven installed. To avoid running the
linkchecker by default use mvn -DskipSphinxTests.
Building/reviewing PRs via the CI
Once a PR is open, you can build it for review using the https://merge-ci.openmicroscopy.org/jenkins/job/BIOFORMATS-linkcheck job on the Jenkins CI. Staging documentation is deployed to Read the Docs via a GitHub Action that run on the PR. See https://docs.readthedocs.io/en/stable/pull-requests.html for more details.
Autogenerated content
The following parts of the documentation are autogenerated during the build:
Supported Formats table and format pages - generated from format-pages.txt
Dataset structure table - generated from the readers
Metadata support table - generated from the readers
Generally, unless you are adding new file support, the format pages are the only ones you are likely to be editing. There is documentation on Adding format/reader documentation pages in the Bio-Formats developer section.
Publishing
The live webpages are updated as part of the release process.
OME Contributing Developer documentation
Hosted at https://ome-contributing.readthedocs.io/ (always latest).
This covers the OME team processes and workflows that may be of interest to external contributors or other open source teams - information about what tools we use and how, rather than internal-only workflows (like standup prep) or anything which needs to be kept private (these belong in the internal docs instead).
Builds
See Documentation jobs.
Source
The source files are at https://github.com/ome/ome-contributing.
Building locally
The build uses Sphinx. You can build locally using make clean
html provided you have Sphinx. There is further
information on getting these set up in the README.
Building/reviewing PRs
Once a PR is open, a build on Read the docs will be triggered. Staging documentation will be available at a given URL linked to the PR. See https://docs.readthedocs.io/en/stable/pull-requests.html for more details.
Publishing
The live webpages are updated when a PR is merged.
OME Data Model and File Formats documentation
This documentation is hosted at https://ome-model.readthedocs.io/en/ and covers the OME-TIFF format and the OME data model.
Builds
See Documentation jobs. Note that this documentation is built and hosted individually and as part of the OME Files documentation bundle.
Source
The source files are in https://github.com/ome/ome-model-documentation.
Building locally
The build uses Sphinx via Maven. You can build locally using make clean
html provided you have both installed.
Building/reviewing PRs
Once a PR is open, a build on Read the docs will be triggered. Staging documentation will be available at a given URL linked to the PR. See https://docs.readthedocs.io/en/stable/pull-requests.html for more details.
Publishing
The live webpages are updated as part of the release process.
OME Internal documentation (private)
For members of the OME team, this set of documentation is available at https://docs.openmicroscopy.org/internal/ behind an ldap log-in.
Builds
Source
https://github.com/openmicroscopy/ome-internal (private repository)
Building locally
The build uses Sphinx via ant. You can build locally using make clean
html provided you have both installed.
Building/reviewing PRs via the CI
Once a PR is open, you can build it using https://ci.openmicroscopy.org/job/OME-internal-merge-docs and then view the rendered text on the live webpages.
Publishing
Content is automatically published to the private URL each day or when the merge build is run.
OMERO documentation
Hosted at https://omero.readthedocs.io/en/{{version}}/ (plus latest redirect - https://omero.readthedocs.io/en/stable/).
This documentation includes developer and sysadmin documentation for OMERO, version history, client overviews and CLI usage documentation. Workflow-based user documentation belongs in the Help instead while features and other overview material aimed at scientists and other non-IT people may belong on the website (see Jekyll-hosted websites).
Builds
See Documentation jobs.
Source
All the source files are in the /omero/ folder at
https://github.com/ome/ome-documentation.
Building locally
The build uses Sphinx via ant. You can build locally using make clean
html provided you have both installed. There is further information on
getting these set up and on build targets in the README.
Building/reviewing PRs
Once a PR is open, a build on Read the docs will be triggered. Staging documentation will be available at a given URL linked to the PR. See https://docs.readthedocs.io/en/stable/pull-requests.html for more details.
Autogenerated/inserted external content
The OMERO documentation is the most complicated set, being the only repo where material is sourced from other repositories. Source repositories are:
https://github.com/ome/openmicroscopy/ (OMERO code repo)
https://github.com/ome/omero-install (OMERO server with Web installation)
https://github.com/ome/omeroweb-install (OMERO.web separately from OMERO.server installation)
Version history
Content for OMERO version history should first be submitted as a PR against https://github.com/ome/openmicroscopy/blob/develop/history.rst in the OMERO code repository. Best practice is to paste the content into the documentation page to test build it before opening the PR. Once the PR is merged, an autogenerated PR can be opened against the documentation repo to transfer the content.
CLI output
The output of the following CLI commands will be used as configuration files in the documentation:
omero config parseomero ldap setdn -homero db scriptomero web config nginxomero web config nginx-location
See autogen_docs to check the name of the output files. Changes to the output should be submitted as a PR against the OMERO code repository.
Installation walkthroughs
Installation walkthroughs for OMERO.server and OMERO.web are generated in separate repositories. When the installation instructions are modified e.g. a new dependency is added, a PR must be opened against one of the following repositories:
https://github.com/ome/omero-install for server installation with OMERO.web
https://github.com/ome/omeroweb-install for OMERO.web installation not with an OMERO.server
OMERO.server installation with OMERO.web:
The walkthroughs are generated using a bash script
Code snippets will be included in the documentation pages using literalinclude e.g. server-ubuntu-ice36.rst
The changes made against https://github.com/ome/omero-install will only be included in the documentation once they are merged and the autogen job has been run. When making changes that need to be visible in the documentation during review, you will need to:
Generate the walkthrough(s)
Open a doc PR
Copy the generated walkthrough(s) under omero/sysadmins/unix/walkthrough
Adjust if required the start/end of the literalinclude
OMERO.web installation separately from OMERO.server:
The walkthroughs are generated using ansible. The omeroweb-install README file contains instructions on how to generate the walkthroughs
The generated walkthroughs are .rst files that are used as pages in the documentation. This workflow does not use literalinclude.
The changes made against https://github.com/ome/omeroweb-install will only be included in the documentation once they are merged and the autogen job has been run. When making changes that need to be visible in the documentation during review, you will need to:
Generate the walkthrough(s)
Open a doc PR
Copy the generated walkthrough(s) under omero/sysadmins/unix/install-web/walkthrough
Model glossary
Content for Glossary of all OMERO Model Objects is generated using GraphPathReport.
To update the content:
Run the command indicated in GraphPathReport to generate
EveryObject.rstReplace EveryObject.rst with the generated one
Open a PR with any changes
Training examples
The contents of the following examples files is not automatically updated:
When the examples under https://github.com/ome/openmicroscopy/tree/develop/examples/Training are modified, you will need to manually make the changes in the above files and open a doc PR.